
ExactFlat for SOLIDWORKS QuickStart Guide:
1. How To Use This Document
To get the most out of your learning experience, we have applied best practices in education to ensure efficient relevant learning experiences, which can be extended directly into the work environment. For each learning element the participant is asked to:
Understand the goal
See the target skill in action (either through video or live with an instructor)
Try the skill yourself
Address questions related to the skill
Practice your skill to develop speed needed in a production environment
Apply the skills acquired to working on your own models and parts in your own environment
All videos referenced or linked in this document can be accessed from:
Quick Start Training Video Playlist
After completing this document users are encouraged to test their skill on one of the supplied ExactFlat models. If users can complete all the tasks in the workflow in under 1 hour, they will have learned the basic workflow sufficiently to begin using ExactFlat in their work environment.
2. The ExactFlat Interface
Model View - SOLIDWORKS 3D modeling environment
Pattern Piece Creator View - to create and edit pattern piece geometry from 3D CAD models
Flattener View - to create 2D flat patterns from 3D CAD models
Pattern Design View - to add and edit pattern features such as notches and seam allowance
Marker/Nesting View - to create nests and DXF export files
Drawing View - to create technical drawings
Database Manager - to add and edit default settings
ExactFlat Options - to configure how ExactFlat works

Model View

Pattern Piece Creator View

Flattener View
Pattern Design View

Marker/Nesting View

Drawing View

3. The ExactFlat Workflow
This is the basic ExactFlat workflow:

4. Learning the Basics of the Core Workflow
4.1. Pattern Piece Creation

4.1.1. Creating and naming pieces
Goal:
Start with a 3D CAD model
Finish with pattern pieces in 3D all named according to your naming criteria
Process Steps & Target Skills:
Selecting faces on a 3D model
Naming pattern pieces
Creating pattern piece
Deleting pattern pieces
Using ‘create all’ to create all pattern pieces
4.1.2. Converting Pieces and Assigning Material Properties
Goal:
Start with pattern pieces which have been created and named
Finish with converted ExactFlat patterns pieces with material properties assigned
Process Steps & Target Skills:
Convert to ExactFlat
Select and assign material properties
Select or Search for materials
Change material assignments
4.2. 3D to 2D Flattening

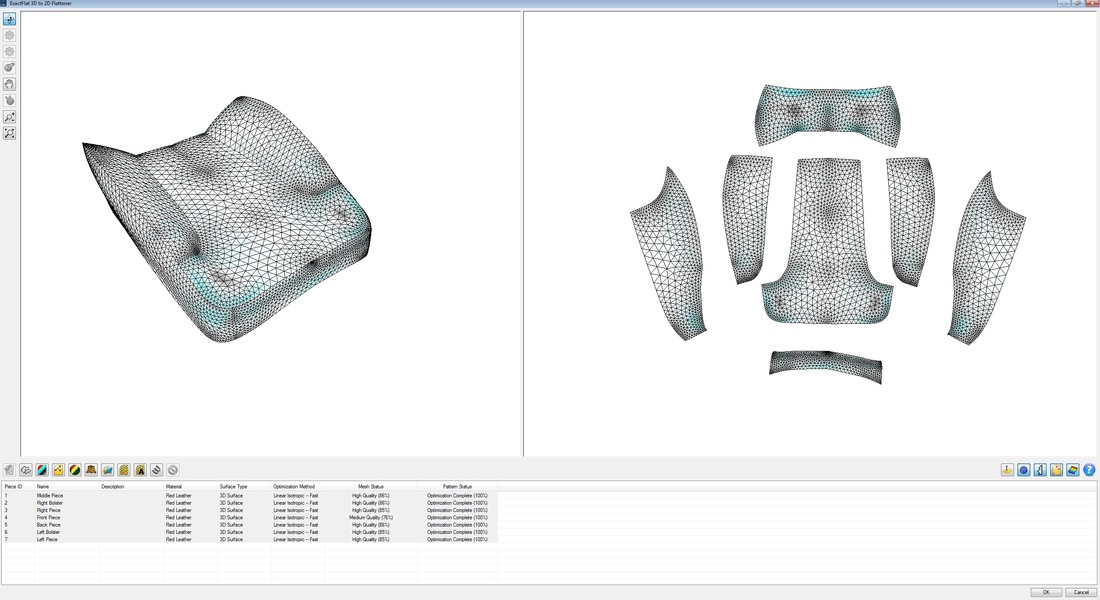
4.2.1. Flatten and Optimize Patterns
Goal:
Start with initial flat patterns
Finish with remeshed, fully pattern pieces optimized for accuracy and fit
Process Steps & Target Skills:
Launch flattener view
Adjust flattener windows
Review strain and sag map
Optimize pattern pieces
Update pattern geometry
4.3. Organize Pattern Pieces

4.3.1. Moving, Finding and Arranging Pattern Pieces
Goal:
Start with flat patterns that have been optimized
Finish with flat patterns that have been organized in an arrangement suitable for adding pattern features
Process Steps & Target Skills:
Launch the move tool
Move pieces
Rotate pieces
Find pieces
Arrange pieces
4.4. Add Pattern Features

4.4.1. Adding Seam Allowances and Notches
Goal:
Start with pattern pieces that have been suitably arranged
Finish with pattern pieces to which seam allowances and notches have been added
Process Steps & Target Skills:
Launch the pattern view
Launch the appropriate edge tool (e.g. seams, hems, etc.)
Select and create edge groups
Naming edge groups
Adding and editing a seam allowance with ‘auto add mate’
Adding and editing notch chains
4.4.3. Adding Grain Lines
Goal:
Start with pattern pieces that have been suitably arranged
Finish with pattern pieces to which grain lines have been added
Process Steps & Target Skills:
Use SOLIDWORKS sketch tools
Apply a grain line to a pattern piece by drawing a line by picking the point of origin and the point of termination
Assign the sketch line to be a grain line by selecting the ExactFlat grain line feature from the ExactFlat tool ribbon
4.5. Creating Technical Drawings
Goal:
Start with finish pattern pieces to which all pattern features have been added
Finish with annotated technical drawings
Process Steps & Target Skills:
Tables
Balloons
Callouts
Launch the drawing tools from the menu
Selecting a template
Choosing a drawing type and positioning it on the template
Configuring drawing settings
Adding drawing feature
Process Steps & Target Skills:

4.5.2. Automatic Nesting
Goal:
Start with a default marker
Finish with compacted nest with lay rules set according to criteria needed
Process Steps & Target Skills:
Launching the nesting view
Initiating nesting
4.7. Export to Cutter

4.6.1. Exporting a Marker
Goal:
Start with a finished nest
Finish with DXF file with the appropriate export settings
Process Steps & Target Skills:
Launching the export utility
Selecting the cutter pre-set
Selecting the specific information to include in the export file